آموزش Keep-Alive در وردپرس برای افزایش سرعت
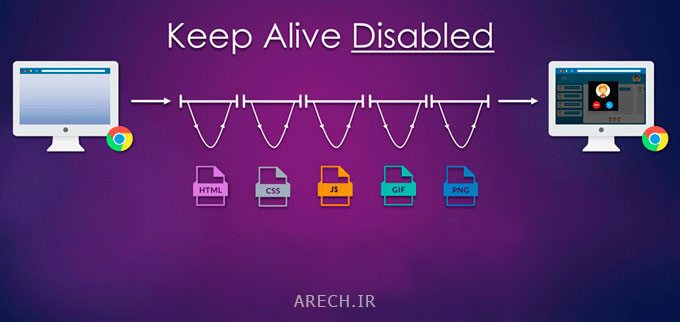
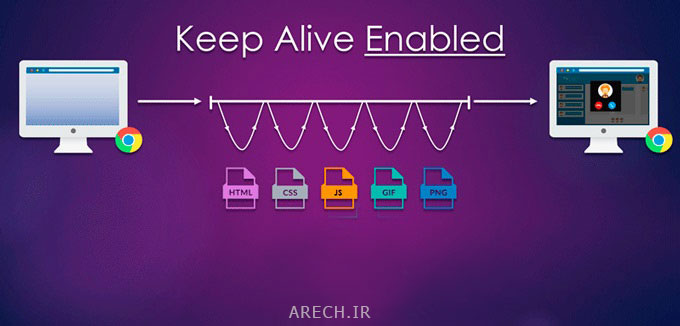
KeepAlive یک ویژگی خاص جهت ارتباط بین کاربر و وب سرور است که اجازه برقراری و ارسال چندین فایل را در یک Connection فراهم میسازد تا سرعت لود وب سایت بیشتر شود. فعال سازی KeepAlive از دو طریق امکانپذیر خواهد بود. 1- فعال سازی KeepAlive از طریق Htaccess ( کاربرد برای هاست اشتراکی ) 2- فعال سازی KeepAlive از طریق وب سرور ( هاست اختصاصی و وب هاستینگ )
فعال سازی KeepAlive از طریق htaccess
به بخش مدیریت فایل پنل خود بروید.
در این جا مثال ما کنترل پنل Cpanel خواهد بود ولی در مجموع برای فعال سازی در سایر پنلها نیز همین رویه کاربردی است.
به دایرکتوری Public_html رفته و فایل را پیدا کنید.
نکته : فایل htaccess. به صورت مخفی بوده و برای نمایش فایلهای مخفی در دایرکتوری از آموزش نمایش فایل مخفی در Cpanel استفاده نمایید.
سپس فایل را با ویرایشگر سیپنل باز کنید و کد زیر را در آن کپی نمایید.
Header set Connection keep-alive
پس از وارد کردن کد بالا ، فایل را ذخیره کرده و از آن خارج شوید.
بدین ترتیب KeepAlive برای صفحات وب سایت شما فعال خواهد شد.
حال برای صحت عملکرد کد وارد شده ، شما میتوانید مجدداً از سایت خود تست گرفته تا شرایط فعالیت KeepAlive را مشاهده نمایید.
How to Enable Keep-Alive in WordPress to Speed up Your Site
learn How to Enable Keep-Alive in WordPress. You need to add ‘Connection: Keep-Alive’ HTTP header in your server in order to enable Keep-Alive. You can also Enable Keep-Alive using .htaccess in WordPress. Or you can choose to edit config file of your Apache/NGINX servers if you do not have access to .htaccess file. The easiest way to Enable Keep-Alive using .htaccess is to add a piece of code (given below).

Before we start about the best practices to Enable Keep-Alive in WordPress and the dos and don’ts. First of all, we need to understand What Keep-Alive is? and How actually Keep-Alive works?
What is Keep-Alive and how it works?
Keep-Alive is a technique to let one TCP (Transmission Control Protocol) connection to access multiple files from server to web browser instead of creating new connection for every new request (file). Keep-Alive also known as persistent HTTP connection.
Furthermore, Lets’ discuss about how it works. You might know about the connection and coordination process of a web browser and server. When you visit a webpage, your web browser create a connection with web-server and sent a request to access a particular file, and server gives OK (go ahead) to the browser.
As a result, Browser started downloading the file, than create another connection for second file and the process goes on.
Suppose, if your web browser requires 10 (TEN) files to display a webpage, browser has to create 10 separate connections after each file download and request one by one to web server for OK to access files.

Therefore, Enabling Keep-Alive help browsers to create only SINGLE connection to access all the files from web server in one go (or in single OK). It significantly reduces number of requests to the web-server, and as a result that reduces Server CPU Uses (Server Load) as well. In addition to that, you will get considerable improvement in page loading speed.

How to enable Keep-Alive in WordPress
Whether you own a blog or a website, page-loading speed always matters and these simple techniques will boost your webpage loading speed by enabling Keep-Alive in WordPress.
Before applying any method, I would suggest you to check whether, is it already enabled on your website or disabled. Because, most of the modern hosting services had already activated Keep-Alive by default. However, you should check it by using this link.
Enable Keep-Alive plays an important role in order to increase your website loading speed. This is one of the most commonly adaptive method by pro-bloggers to reduce website loading time.
Finally, let’s discuss, how to Enable Keep-Alive using .htaccess in WordPress or on Apache/NGINX servers.
How to Enable Keep-Alive using .htaccess file in WordPress
You need to add the given below piece of code into your .htaccess file.
# TN START ENABLE KEEP ALIVE
<ifModule mod_headers.c>
Header set Connection keep-alive
</ifModule>
# TN END ENABLE KEEP ALIVE
Add this code after the last line in your .htaccess file; it will add Keep-Alive HTTP headersthat enables Keep-Alive.
Enable Keep-Alive in Apache
In most of the new Apache servers, Keep-Alive should be auto enabled. If it is not enabled, find Apache HTTP Server configuration file (httpd.conf) of your server.
you can find it here – /etc/httpd/conf/httpd.conf
and
Add the below written code in that file…
# Set it On to enable Keep-Alive, Off to disable Keep-Alive
KeepAlive On

# Set maximum requests per connection, set 0 for unlimited request, 100 request per connection is ideal
MaxKeepAliveRequests 100

# Set per connection timeout for next request
KeepAliveTimeout 15
Enable Keep-Alive in NGINX
In almost all the NGINX servers, Keep-Alive comes enabled by default. However, if it is not enabled you can check the same by finding ‘keepalive_disable’ in NGINX core module (ngx_http_core_module).
Have you Enabled Keep-Alive on your website. YES, NO, Not Sure. Do check it again and Enable Keep-Alive using .htaccess in WordPress now.
Hope you find this guide useful. Which method you use to Enable Keep-Alive? Did you find any improvement in page loading speed? Do let us know in the comment section below.
Cheers!
مطلب در تاریخ 23 دی 1398 به روز شده است


ممنون از اطلاعات خوبتون